
Files and digitizing
How do you digitize a logo for company uniforms? Left chest, full back and cap sizes, plus customer approval
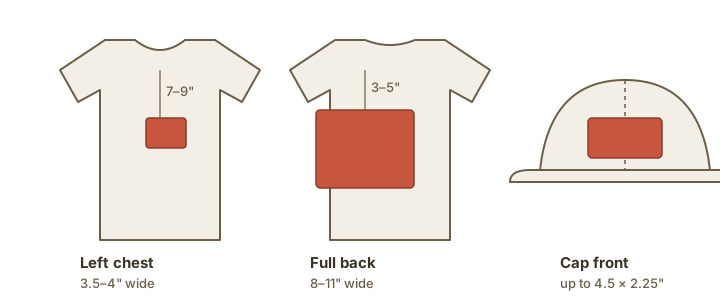
Uniform logos follow near-standard sizes: 3.5 to 4" wide on the left chest, 8 to 11" on the full back, up to 4.5 × 2.25" on a cap front and 2.5 to 3" on a sleeve.
Before digitizing, simplify: letters under 3/16" (5 mm), gradients and strokes thinner than 1 mm do not exist in embroidery and must be adapted, with the customer's sign-off.
What closes the job without redos is written approval of a stitched sample on the same fabric as the uniform, before you run the batch.
What changes between a printed logo and an embroidered one?
The logo the company sends was made for screens and paper: gradients, drop shadows, hairlines and sometimes a tagline in tiny type underneath. Embroidery is made of 0.4 mm thread and reproduces none of that literally. Digitizing is translating the logo into thread: deciding what becomes satin, what becomes fill, what becomes a running outline and what goes away.
So the first step is not opening the software; it is looking at the logo and listing what has to change. The sooner the customer understands that "the embroidery is a version of the logo, not a copy", the faster the order moves.
- Gradients become a flat color (or two colors side by side, if the customer insists).
- Small lettering: the legible minimum is 3/16" (5 mm) tall in satin; below that, the tagline goes or grows.
- Thin strokes (under 1 mm) become running stitch or thicken to 1.2 to 1.5 mm.
- Black keylines around everything often go, because in embroidery the satin edge already defines the shape.
- Large flat backgrounds become fill or go away, using the garment color as background (fewer stitches, lighter, cheaper).
- Shadows and glow effects go.
What are the standard logo sizes on uniforms?
| Placement | Logo width | Max height | Position on the garment | Hoop |
|---|---|---|---|---|
| Left chest (shirt, polo, tee, scrubs) | 3.5 to 4" | 3" | Logo center 7 to 9" below the shoulder seam and 4 to 5" from center front on adult sizes | 4 × 4" |
| Left chest, horizontal logo (long text) | up to 4.5" | 2" | Same position; align the logo base with the pocket top if there is one | 4 × 4" or 5 × 7" |
| Full back (jacket, tee, vest) | 8 to 11" | 10" | Centered, 3 to 5" below the collar | 8 × 12" or larger |
| Yoke (below the collar) | 2.5 to 3" | 1.25" | Centered, 1.25 to 1.5" below the collar seam | 4 × 4" |
| Sleeve | 2.5 to 3" | 2.5" | Centered on the sleeve, 1.25 to 2" below the shoulder seam | 4 × 4" (or adhesive stabilizer) |
| Cap front | up to 4.5" | 2 to 2.25" | Centered on the center seam or the front panel | Cap frame |
| Cap side | 1.5 to 2.5" | 1.25" | Left side panel, above the bill | Cap frame |
Tip: Make one file per size, not one resized file. The 3.5" chest logo and the 10" back logo have different density, underlay and detail: on the back, the small lettering returns and the background can become fill; on the chest, they go. See why in DST vs PES vs JEF.
How do you digitize the logo step by step?
- Ask for the logo as a vector (SVG, PDF, AI or EPS) and, failing that, the largest PNG with a transparent background the company has. Also ask for color codes (Pantone, CMYK or hex) to match thread.
- Set the final size in inches and millimeters from the chart above and the garment being stitched. Write it down.
- Open the Meus Bordados editor, start a new design and load the image as a background, already scaled to the final size. See turning an image into embroidery.
- Trace over it with the shape tools: wide areas in Tatami, narrow shapes (up to 10 mm) in Satin, lines as Running-stitch outline. For simple logos with few colors, Instant digitizing generates the areas automatically and you only adjust.
- Rebuild the text with the Text tool instead of stitching the letters from the image: the software generates clean satin along the font. If the logo font is not on your computer, choose the closest one from the library and tell the customer.
- Order the objects: backgrounds first, then shapes, then lettering and outlines, grouping by color to reduce changes. See colors and stitching order.
- Set underlay and pull compensation for the uniform fabric: piqué and knits want zigzag underlay and slightly higher compensation; twill and canvas stay at default.
- Simulate, check the total stitch count in the footer (a left chest logo usually runs 4,000 to 12,000 stitches) and export SVG for the preview and DST, PES or JEF for the machine.
Watch out: A logo with a solid white background on a dark polo becomes a 15,000 to 20,000-stitch block, stiff and expensive. Propose the "no background" version, with the logo colors stitched straight onto the fabric: that is what most brands do on uniforms.
How do you get customer approval without redos?
On uniforms, a mistake costs the whole batch. Approval has three stages, each recorded in writing (email or text):
1. Approval of the adaptation (before digitizing)
Send the customer an image of the logo with the changes marked ("tagline removed", "gradient becomes flat blue", "outline thickened") and the size in inches over a photo of the garment. Ask for a "go ahead". This prevents the "but the original has a highlight here" conversation after the embroidery is done.
2. Approval of the preview (after digitizing)
Export the SVG from the editor and send it with the thread list (name and color number). The Meus Bordados 3D preview already shows the texture and helps the customer picture it; still, make clear it is a simulation.
3. Approval of the stitched sample (before the batch)
Stitch the logo on a swatch of the same fabric and color as the uniform (ask the supplier for a sample garment or swatch) and send a photo, or hand over the sample. Charge for the sample (and credit it if the order closes): it is work, and customers who will not pay for a sample tend not to order. Only after the written "approved" do you run the batch.
Keep the physical sample with the customer's name and date. On the next order it is the reference for color and size. In Meus Bordados, attach the .bordado to the order card and register the company under Clients, with the contact who approves.
How do you charge for digitizing and the batch?
The trade charges a digitizing fee once per size, plus a per-piece embroidery price that drops with quantity (breaks at 12, 24, 48, 100 pieces). The chest file costs less than the back file, which has more stitches and detail. If the customer brings a file digitized elsewhere, charge a check-and-test fee, because you will stitch the sample all the same.
Spell out in the quote what happens if the logo changes later (new file, new fee) and that turnaround counts from sample approval, not from first contact. See the full method in how to price custom embroidery.
Frequently asked questions
What is the standard size for a left chest logo?
3.5 to 4" wide and up to 3" tall, centered 7 to 9" below the shoulder seam and 4 to 5" from center front. Horizontal logos can reach 4.5" wide at 2" tall.
How big should a full back logo be?
8 to 11" wide, centered 3 to 5" below the collar. It needs an 8 × 12" hoop or larger.
What size logo fits on a cap?
Up to 4.5" wide by 2 to 2.25" tall on the front, depending on the cap style and cap frame. Letters at least 5/16" (8 mm).
Can I use the same file for the chest and the back?
No. Resizing more than 10% to 20% ruins density. Make one file per size: the back file brings back details the chest file simplified.
The customer sent a tiny JPG. Now what?
Ask the company's designer or printer for the vector; almost every company has one. If it does not exist, trace the shapes over the image in the editor and rebuild the text with the Text tool in the closest font.
Sources
Related articles
- Files and digitizingHow do you convert an image or logo into an embroidery file?Step by step to turn a logo (PNG, JPG) into a stitch file: prepare the artwork, auto-digitize or digitize by hand, choose stitch types, review and export DST, PES or JEF. · 7 min read
- Embroidery techniqueHow do you embroider a hat and a t-shirt without puckering?Step by step for embroidering knit t-shirts and structured caps without puckering: the right stabilizer, hooping without stretching, stitch order, needle and design size. · 7 min read
- Business and pricingHow much should you charge for custom embroidery? Formula and pricing tableHow to price custom embroidery: machine hour cost, thread and stabilizer, price per 1,000 stitches, digitizing fee, order minimums and margin, with a worked example. · 6 min read