
Embroidery technique
Embroidery hoop sizes explained: which hoop should you use?
Always use the smallest hoop the design fits in, leaving at least 1 cm (about 3/8 in) of clearance to the edge: the smaller the hoop, the more stable the fabric and the sharper the registration.
The most common fields on home machines are 4 × 4 in (100 × 100 mm), 5 × 7 in (130 × 180 mm) and 8 × 12 in (200 × 300 mm); commercial fields go beyond 12 × 20 in.
The "hoop size" in a product name is usually the sewing field, which is smaller than the frame; always check the usable field measurement.
What does the hoop size actually mean?
When a manufacturer says a machine "has a 4 × 4 hoop", it is talking about the sewing field: the maximum area the needle can reach, in inches (4 × 4 in = 100 × 100 mm). The physical frame is larger than that, because part of it is outside the needle's reach.
You will also see the measurement in millimeters, which is more precise. Embroidery software works in millimeters, so the equivalents are worth memorizing:
| Common name | Sewing field | What it is for |
|---|---|---|
| 4 × 4 in | 100 × 100 mm | Names, monograms, left-chest logos, small patches, names on uniforms. |
| 5 × 7 in | 130 × 180 mm | Baby items, hand towels, bibs, kids' designs, two-line names. |
| 6 × 10 in | 160 × 260 mm | Bath towels, blankets, larger appliqué, long text. |
| 8 × 8 in | 200 × 200 mm | Wall art, pillows, large square designs. |
| 8 × 12 in | 200 × 300 mm | Jacket backs, blankets, table runners. |
| Commercial | 12 × 20 in (300 × 500 mm) and up | Large pieces and multiple pieces at once; separate cap frames. |
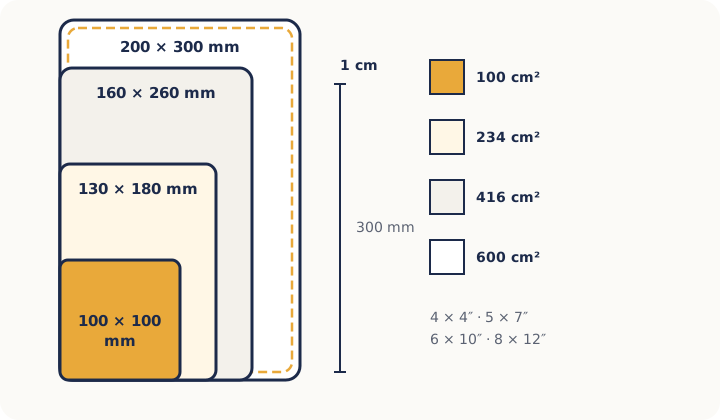
Why use the smallest hoop possible?
The hoop exists to keep the fabric taut and still while the needle works. The bigger the hoop, the more fabric is free between the design and the frame, and the more it shifts with every stitch. That shows up as outlines that do not meet, letters that "walk" and puckering around the embroidery.
The rule of thumb is to pick the smallest hoop the design fits in with 1 cm of clearance on each side. The clearance is needed because the presser foot needs room and because the design may have tie-off stitches slightly outside the visible area.
When the design is small but the item is large (a name in the corner of a bath towel, for example), keep using the small hoop and let the rest of the towel hang outside, rolled up and clipped so it does not slide under the needle.
Tip: In the Meus Bordados editor, the Smallest that fits button in the Hoop panel picks the smallest hoop of your machine that holds the design, and the note below shows how much room is left to the edge. See Size, position and hoop.
Which hoops do the common brands use?
Each brand has its own hoop line, and not every hoop fits every machine of the brand. Some examples to guide your research (confirm in your model's manual):
- Brother and Baby Lock home machines: 4 × 4 in on entry models (PE535, SE600); 5 × 7 in on mid-range models (PE800, SE1900); 6 × 10 in and larger on the top Innov-is models. The PR multi-needle series reaches 8 × 12 in and has cap frames.
- Janome: the Memory Craft 500E and 550E ship with 140 × 140, 140 × 200, 200 × 200 and 200 × 280 mm hoops (the 550E reaches 200 × 360 mm). The JEF format stores the hoop code in the file.
- Elna: follows the Janome line, with the same hoops on several models.
- Bernina, Husqvarna Viking, Pfaff: proprietary hoops per model; check the sewing field of each hoop in the manual.
- Tajima, Barudan, Ricoma and other commercial machines: tubular hoops in many sizes (from 120 × 120 to 360 × 500 mm and beyond), border frames for flat goods and rotating cap frames.
Are magnetic hoops worth it?
Magnetic hoops replace the screw-tightened ring with two frames held by strong magnets. The advantages are real: hooping takes seconds, they do not leave hoop burn on fleece or velvet, and they grip thick fabrics such as terry towels and denim without a fight. The downside is the price, several times that of a standard hoop, and care with the magnets around the machine and cards.
For shops that stitch towels and sweatshirts in volume, a magnetic hoop pays for itself in time and in pieces that stop being ruined. For occasional names on flat fabric, the standard hoop does the job.
How do you hoop fabric correctly?
- Cut the stabilizer about 1 in (3 cm) larger than the hoop on every side. Use cut-away on knits and fleece, tear-away on stable cotton, and tear-away underneath plus water-soluble topping on towels.
- Loosen the outer ring's screw and lay the stabilizer and fabric over it, with the grain straight.
- Press the inner ring in from the top, evenly. The fabric should be smooth but not stretched (stretching distorts knits and the embroidery puckers afterwards).
- Tighten the screw only until the assembly is firm. Do not tug the fabric by the edges after hooping: it pulls the grain off.
- Mark the embroidery center on the item with chalk or a water-soluble pen and align it with the hoop marks. At the machine, use the "trace" or outline function, if available, before stitching.
Watch out: If the item does not fit even your largest hoop, do not try to "stretch" the sewing field: the needle will hit the frame. Split the design into two parts with registration marks or send the job to a larger machine.
How do you know whether a design fits the hoop before stitching?
Every embroidery file has a width and height in millimeters. Open the design in a viewer (the Meus Bordados viewer shows the size next to the stitch count) and compare it with your machine's sewing field, remembering the 1 cm clearance. JEF and newer PES files carry the hoop in the file and the machine warns on a mismatch; DST does not, so the check is entirely yours.
If the design is slightly over the field, do not resize by more than 10 to 20 percent: finished stitches lose density. The right move is to go back to the project file and generate the embroidery at the new size, as explained in DST vs PES vs JEF.
Frequently asked questions
Can I use a hoop larger than the machine's field?
No. The sewing field is limited by the machine arm's travel; a larger hoop simply will not attach or the machine refuses it. The most you can stitch in one hooping is your model's maximum field.
Which hoop should I buy for towels?
Names on towels fit the 4 × 4 in hoop. For designs with a name underneath, large monograms and borders, the 5 × 7 in hoop is ideal. If you stitch many towels, consider a magnetic hoop, which grips terry without marking it.
Why did the embroidery come out crooked in the hoop?
Almost always the fabric was hooped off-grain or pulled after hooping. Mark the center and reference lines on the item, align them with the hoop marks and use the machine's trace function before starting.
What is a 4 × 4 hoop in millimeters?
4 × 4 inches is about 100 × 100 mm. 5 × 7 in is 130 × 180 mm, 6 × 10 in is 160 × 260 mm and 8 × 12 in is 200 × 300 mm.
Related articles
- Embroidery techniqueEmbroidery stabilizer guide: tear-away, cut-away or wash-away, and which to use on each fabricWhen to use tear-away, cut-away, wash-away and fusible stabilizer for machine embroidery, with a fabric-by-fabric chart, weights, hooping tips and common mistakes. · 7 min read
- Embroidery techniqueHow do you embroider a hat and a t-shirt without puckering?Step by step for embroidering knit t-shirts and structured caps without puckering: the right stabilizer, hooping without stretching, stitch order, needle and design size. · 7 min read
- Embroidery technique12 common machine embroidery mistakes and how to fix themPuckering, thread breaks, bird nests, gaps in outlines, bobbin showing on top, hoop burn and more: the most common machine embroidery problems and the fix for each. · 6 min read